Showing posts with label Data analytic. Show all posts

Friday, 14 October 2016

Big Data & Retail VoIP

Big Data is Reality and is nothing new to telecoms service providers. Telecommunications service providers are sitting on gold mines of data, Customer experience and data collected about calls could be used for analytics. This could help to forecast traffic patterns, fraud detection, customer experience (ASR, NER etc).

Data is raw material for processing to create knowledge, and without debate, it's an common understanding that knowledge is power. For Businesses it all about power to make good decisions. The more business knows about it’s customers and operations, best possible decisions could be made, and chances of costly mistakes could be reduced.


Retail VoIP companies generate good amount of data daily. Every call a customer make, company can extract valuable information, In order to best exploit this ever increasing amount of data, Service providers require big data solutions to get best possible insight, and take business problem solving skills to new dimensions.

Call detail records are recorded since decades for billing purposes. Communication service providers willing to maximize their revenue potential must have right solution in place to get actionable insight of recorded data. globally most of the service providers suffer from real-time decision making challenges. Most of the operational decision are made manually or parietal hard-coded in Operations support systems, in result these decisions tends to be subjective and suboptimal. The promise of data-driven decision are recognized, In order to exploit full potential, service providers are required to find possibilities of what they can do with big data analytics and decipher information to support decision making.

Telecommunications service providers, over the globe are experiencing an unprecedented rise in volume, variety and velocity of data. One who can address this big data challenge will have an competitive edge, will gain market share with increased revenue and profits using new innovative services. successfully addressing big data challenge will help service providers achieve their objectives.

Friday, 24 April 2015

Installing Single Node Hadoop 2.6 using Bash Script

Get Started

We are going to write simple bash script and execute it to install Hadoop 2.6 with all its dependencies, Now we will check how to install stable version of Apache Hadoop from bash script on a Server running Linux Ubuntu 14 x64 but should work on all Debian based systems. We will write content to text file using any of your favorite test editor. give it permission to execute and enjoy. hope it  works without error, else let me know issue to update it, it works fine for me on 2 different machines running Linux mint 17 and Ubuntu 14.04 respectively.

What is Bash?

Descended from the Bourne Shell, Bash is a GNU product, the "Bourne Again SHell." It's the standard command line interface on most Linux machines. It excels at interactivity, supporting command line editing, completion, and recall. It also supports configurable prompts - most people realize this, but don't know how much can be done.

Apache Hadoop?

The Apache™ Hadoop® project develops open-source software for reliable, scalable, distributed computing.

The Apache Hadoop software library is a framework that allows for the distributed processing of large data sets across clusters of computers using simple programming models. It is designed to scale up from single servers to thousands of machines, each offering local computation and storage. Rather than rely on hardware to deliver high-availability, the library itself is designed to detect and handle failures at the application layer, so delivering a highly-available service on top of a cluster of computers, each of which may be prone to failures.

The project includes these modules:
  • Hadoop Common: The common utilities that support the other Hadoop modules.
  • Hadoop Distributed File System (HDFS™): A distributed file system that provides high-throughput access to application data.
  • Hadoop YARN: A framework for job scheduling and cluster resource management.
  • Hadoop MapReduce: A YARN-based system for parallel processing of large data sets.

Write Script File

To write script for installation open new file named install_hadoop.sh and put following content in it.
#!/bin/bash  

# Script to install Sun Java and Hadoop 2.6 

clear  

# This command is used to tell shell, turn installation mode to non interactive  
# and set auto selection of agreement for Sun Java  
export DEBIAN_FRONTEND=noninteractive  
echo debconf shared/accepted-oracle-license-v1-1 select true | sudo debconf-set-selections  
echo debconf shared/accepted-oracle-license-v1-1 seen true | sudo debconf-set-selections  


echo "Bash Script for Installing Sun Java for Ubuntu!"  

echo "Now Script will try to purge OpenJdk if installed..."  

# purge openjdk if installed to remove conflict  
apt-get purge openjdk-\* -y  

echo "Now we will update repository..."  

apt-get update -y  

echo "Adding Java Repository...."  

apt-get install python-software-properties -y  
add-apt-repository ppa:webupd8team/java -y  

echo "Updating Repository to load java repository"  

apt-get update -y  

echo "Installing Sun Java....."  
sudo -E apt-get purge oracle-java7-installer -y  
sudo -E apt-get install oracle-java7-installer -y  


echo "Installation completed...."  

echo "Installed java version is...."  

java -version  


apt-get install openssh-server -y  
/etc/init.d/ssh status  
/etc/init.d/ssh start  

ssh-keyscan -H localhost > ~/.ssh/known_hosts  
y|ssh-keygen -t dsa -P '' -f ~/.ssh/id_dsa  
cat ~/.ssh/id_dsa.pub > ~/.ssh/authorized_keys  
ssh-add  

cd /usr/local  
sudo wget http://mirror.sdunix.com/apache/hadoop/common/hadoop-2.6.0/hadoop-2.6.0.tar.gz  
tar xzf hadoop-2.6.0.tar.gz  
mkdir hadoop  
mv hadoop-2.6.0/* hadoop/  

echo "Now script is updating Bashrc for export Path etc"  

cat >> ~/.bashrc << EOL  
export HADOOP_HOME=/usr/local/hadoop  
export HADOOP_MAPRED_HOME=/usr/local/hadoop  
export HADOOP_COMMON_HOME=/usr/local/hadoop  
export HADOOP_HDFS_HOME=/usr/local/hadoop  
export YARN_HOME=/usr/local/hadoop  
export HADOOP_COMMON_LIB_NATIVE_DIR=/usr/local/hadoop/lib/native  
export JAVA_HOME=/usr/  
export PATH=$PATH:/usr/local/hadoop/sbin:/usr/local/hadoop/bin:$JAVA_PATH/bin  
EOL  

cat ~ / .bashrc  

source ~ / .bashrc  

echo "Now script is updating hadoop configuration files"  

cat >> /usr/local/hadoop/etc/hadoop/hadoop-env.sh << EOL  
export JAVA_HOME=/usr/  
EOL  

cd /usr/local/hadoop/etc/hadoop  

cat > core-site.xml << EOL  
<configuration>  
<property>  
<name>fs.default.name</name>  
<value>hdfs://localhost:9000</value>  
</property>  
</configuration>  
EOL  

cp mapred-site.xml.template mapred-site.xml  
cat > mapred-site.xml << EOL  
<configuration>  
<property>  
<name>mapreduce.framework.name</name>  
<value>yarn</value>  
</property>  
</configuration>  
EOL  

cat > yarn-site.xml << EOL  
<configuration>  
<property>  
<name>yarn.nodemanager.aux-services</name>  
<value>mapreduce_shuffle</value>  
</property>  
</configuration>  
EOL  

cat > hdfs-site.xml << EOL  
<configuration>  
<property>  
<name>dfs.replication</name>  
<value>1</value>  
</property>  
<property>  
<name>dfs.name.dir</name>  
<value>file:///home/hadoop/hadoopinfra/hdfs/namenode </value>  
</property>  
<property>  
<name>dfs.data.dir</name>  
<value>file:///home/hadoop/hadoopinfra/hdfs/datanode </value >  
</property>  
</configuration>  
EOL  

echo "Completed process Now Reloading Bash Profile...."  
cd ~  

echo "You may require reloading bash profile, you can reload using following command."  
echo "source ~/.bashrc"  

echo "To Start you need to format Name Node Once you can use following command."  
echo "hdfs namenode -format"  

echo "Hadoop configured. now you can start hadoop using following commands. "  
echo "start-dfs.sh"  
echo "start-yarn.sh"  

echo "To stop hadoop use following scripts."  
echo "stop-dfs.sh"  
echo "stop-yarn.sh"  


Now we will give it permission to make it executable.
 ~$ chmod 755 install_hadoop.sh

Now we can execute script using following command, Since installation require root excess, you are required to login as root or switch to root using command "su -"
 ~$ ./install_hadoop.sh  
after successful completion of script you can now move forward for Formation name Node and starting Hadoop.

You may face command not recognized issue, mean bash profile not reloaded. safe way is to reload manually using following command.
 ~$ source ~/.bashrc

Initializing the Single-Node Cluster

Formatting the Name Node:

While setting up the cluster for the first time, we need to initially format the Name Node in HDFS.

 ~$ cd ~  
 ~$ hdfs namenode -format  

Starting Hadoop dfs daemons:

 ~$ start-dfs.sh  

Starting Yarn daemons:

 ~$ start-yarn.sh  

Check all daemon processes:

 ~ $ Jps  

 6069 NodeManager  
 5644 DataNode  
 5827 SecondaryNameNode  
 4692 ResourceManager  
 6165 Jps  
 5491 NameNode  

* Process id will be changed for each execution, main idea is to check if certain processes are running fine.

You should now be able to browse the name-node in your browser (after a short delay for start-up) by browsing to the following URLs:

name-node: http://localhost:50070/

Stopping all daemons:

 ~$ stop-dfs.sh  
 ~$ stop-yarn.sh  
   
Enjoy.

Thursday, 23 April 2015

Apache Hive? Compile Hive with Ubuntu 14 :: HADOOP 2.6.0

Get Started Hive

The Apache Hive ™ is data warehouse infrastructure built on top of Hadoop that software facilitates querying and managing large data-sets residing in distributed storage. Hive provides a mechanism to project structure onto this data and query the data using a SQL-like language called HiveQL. At the same time this language also allows traditional map/reduce programmers to plug in their custom mappers and reducers when it is inconvenient or inefficient to express this logic in HiveQL. For details visit WIKI

By default, Hive stores metadata in an embedded Apache Derby database, and other client/server databases like MySQL, PostgreSQL can optionally be used. While Yahoo was working with PIG for deployment on Hadoop, Facebook started their own warehouse solutions on Hadoop which resulted on HIVE, The reason behind using hive is because traditional warehousing  solutions are getting expensive, While initially developed by Facebook, Apache Hive is now used and developed by other companies such as Netflix.

Components of Hive:

HCatalog is a component of Hive. It is a table and storage management layer for Hadoop that enables users with different data processing tools — including Pig and MapReduce — to more easily read and write data on the grid.
WebHCat provides a service that you can use to run Hadoop MapReduce (or YARN), Pig, Hive jobs or perform Hive metadata operations using an HTTP (REST style) interface.

Hive is not built for quick response applications thus, can not be compared with other applications designed for reduced response times. it is build for data mining applications with post processing of data distributed over Hadoop cluster.

features of Hive include:
  • Indexing to provide acceleration
  • Different storage types such as plain text, RCFile, HBase, ORC, and others.
  • Metadata storage in an RDBMS, significantly reducing the time to perform semantic checks during query execution.
  • Operating on compressed data stored into the Hadoop ecosystem using algorithms including DEFLATE, BWT, snappy, etc.
  • Built-in user defined functions (UDFs) to manipulate dates, strings, and other data-mining tools. Hive supports extending the UDF set to handle use-cases not supported by built-in functions.
  • SQL-like queries (HiveQL), which are implicitly converted into Map-reduce, or Spark jobs.

HiveQL

HiveQL is based on SQL, but it does not strictly follow the full SQL-92 standard. HiveQL offers extensions not in SQL, including multi-table inserts and create table as select, but only offers basic support for indexes. Also, HiveQL lacks support for transactions and materialized views, and only limited sub-query support. Support for insert, update, and delete with full ACID functionality was made available with release 0.14.

Internally, a compiler translates HiveQL statements into a directed acyclic graph of MapReduce or Tez, or Spark jobs, which are submitted to Hadoop for execution.

Data is hive is organized in three formats.
Tables: They are very similar to RDBMS tables and contains rows and tables. Hive is just layered over the Hadoop File System (HDFS), hence tables are directly mapped to directories of the file-systems. It also supports tables stored in other native file systems.

Partitions: Hive tables can have more than one partition. They are mapped to sub-directories and file systems as well.

Buckets: In Hive data may be divided into buckets. Buckets are stored as files in partition in the underlying file system.

Hive store metastore in relational database containing metadata about hive schema.

For details on how to use HiveQL check following Wikis.

Prerequisite for Hive

since hive is based on Hadoop and uses HDFS, Hadoop is required to be installed prior to Hive installation, we have used Hadoop 2.6.0 latest release till date. to install hadoop is not configured earlier, follow my post on How to Install Hadoop 2.6.0

Next we require Apache Maven and Subversion. Apache Maven is required to build Apache Hive while subversion is required to clone source for compilation. to resolve Apache Maven version conflict issue we will remove maven2 before maven installation if installed. 
 ~$ sudo apt-get update  
 ~$ sudo apt-get remove maven2  
 ~$ sudo apt-get install maven  
   
 ~$ apt-get install subversion  
   

Compile Hive

after prerequisite for hive installed, we can move forward to compile Hive, We will clone source from repository using subversion and will build it using maven.

 svn co http://svn.apache.org/repos/asf/hive/trunk hive  
 cd hive  
   
 mvn clean install -Phadoop-2,dist -e -DskipTests  

Now compilation is completed successfully, we will export Hive path, change version number from export command if changed, this can be verified by listing directory.

 ~$ nano ~/.bashrc  

Add following line:
 export HIVE_HOME=/root/hive/packaging/target/apache-hive-1.2.0-SNAPSHOT-bin/apache-hive-1.2.0-SNAPSHOT-bin  


Save and close file and reload bachrc using source command.
 ~$ source ~/.bashrc  

Now we will create warehouse for Hive in Hadoop, temp directory and set permissions for write.
 ~$ $HADOOP_HOME/bin/hadoop fs -mkdir    /tmp  
 ~$ $HADOOP_HOME/bin/hadoop fs -mkdir    /user/  
 ~$ $HADOOP_HOME/bin/hadoop fs -mkdir    /user/hive/  
 ~$ $HADOOP_HOME/bin/hadoop fs -mkdir    /user/hive/warehouse  
   
 ~$ $HADOOP_HOME/bin/hadoop fs -chmod g+w  /tmp  
 ~$ $HADOOP_HOME/bin/hadoop fs -chmod g+w  /user/hive/warehouse  

To start Beeline CLI use following.
 ~$ $HIVE_HOME/bin/beeline -u jdbc:hive2://  


Now we are ready to use Hive, for testing we have practiced Hive and provided is snap of shell. We have practiced this with 8GB RAM with 4 cores of CPU on SSD Drives.
 0: jdbc:hive2://> create database mydb;  
 15/04/22 08:31:23 [HiveServer2-Background-Pool: Thread-32]: WARN metastore.ObjectStore: Failed to get database mydb, returning NoSuchObjectException  
 OK  
 No rows affected (1.565 seconds)  
 0: jdbc:hive2://> CREATE TABLE mydb.testdata (  
 0: jdbc:hive2://>   id  INT,  
 0: jdbc:hive2://>   data VARCHAR(30)  
 0: jdbc:hive2://> );  
 OK  
 No rows affected (0.561 seconds)  
 0: jdbc:hive2://> INSERT into mydb.testdata(id, data) values(1, 'Testing 1');  
 Query ID = root_20150422083821_5e2e9f2c-dc47-4650-9280-a9e52cb61c7c  
 Total jobs = 3  
 Launching Job 1 out of 3  
 Number of reduce tasks is set to 0 since there's no reduce operator  
 15/04/22 08:38:22 [HiveServer2-Background-Pool: Thread-59]: ERROR mr.ExecDriver: yarn  
 15/04/22 08:38:23 [HiveServer2-Background-Pool: Thread-59]: WARN mapreduce.JobSubmitter: Hadoop command-line option parsing not performed. Implement the Tool interface and execute your application with ToolRunner to remedy this.  
 Starting Job = job_1429700414970_0001, Tracking URL = http://hadoop:8088/proxy/application_1429700414970_0001/  
 Kill Command = /usr/local/hadoop/bin/hadoop job -kill job_1429700414970_0001  
 WARN : Hadoop command-line option parsing not performed. Implement the Tool interface and execute your application with ToolRunner to remedy this.  
 Hadoop job information for Stage-1: number of mappers: 1; number of reducers: 0  
 15/04/22 08:38:31 [HiveServer2-Background-Pool: Thread-59]: WARN mapreduce.Counters: Group org.apache.hadoop.mapred.Task$Counter is deprecated. Use org.apache.hadoop.mapreduce.TaskCounter instead  
 2015-04-22 08:38:31,952 Stage-1 map = 0%, reduce = 0%  
 2015-04-22 08:38:39,433 Stage-1 map = 100%, reduce = 0%, Cumulative CPU 2.24 sec  
 MapReduce Total cumulative CPU time: 2 seconds 240 msec  
 Ended Job = job_1429700414970_0001  
 Stage-4 is selected by condition resolver.  
 Stage-3 is filtered out by condition resolver.  
 Stage-5 is filtered out by condition resolver.  
 Moving data to: hdfs://localhost:9000/user/hive/warehouse/mydb.db/testdata/.hive-staging_hive_2015-04-22_08-38-21_684_4213030447536309872-1/-ext-10000  
 Loading data to table mydb.testdata  
 Table mydb.testdata stats: [numFiles=1, numRows=1, totalSize=12, rawDataSize=11]  
 MapReduce Jobs Launched:  
 Stage-Stage-1: Map: 1  Cumulative CPU: 2.24 sec  HDFS Read: 3732 HDFS Write: 77 SUCCESS  
 Total MapReduce CPU Time Spent: 2 seconds 240 msec  
 OK  
 No rows affected (19.328 seconds)  
 0: jdbc:hive2://> SELECT * FROM mydb.testdata;  
 OK  
 +----------+------------+--+  
 | testdata.id | testdata.data |  
 +----------+------------+--+  
 | 1    | Testing 1 |  
 +----------+------------+--+  
 1 row selected (0.223 seconds)  
   
 0: jdbc:hive2://> SELECT * FROM mydb.testdata WHERE testdata.id%2==1;  
 OK  
 +----------+------------+--+  
 | testdata.id | testdata.data |  
 +----------+------------+--+  
 | 1    | Testing 1 |  
 +----------+------------+--+  
 1 row selected (0.129 seconds)  
 0: jdbc:hive2://>  


Enjoy.

Tuesday, 21 April 2015

Installing Hadoop Single Node - 2.6

Get Started

Now we will check how to install stable version of Apache Hadoop on a Server running Linux Ubuntu 14 x64 but should work on all Debian based systems. To start we need to acquire hadoop package and get java installed, to install java, if not already installed follow my install java post. to check which versions of java are supported with hadoop check Hadoop Java Versions.

Apache Hadoop?

The Apache™ Hadoop® project develops open-source software for reliable, scalable, distributed computing.

The Apache Hadoop software library is a framework that allows for the distributed processing of large data sets across clusters of computers using simple programming models. It is designed to scale up from single servers to thousands of machines, each offering local computation and storage. Rather than rely on hardware to deliver high-availability, the library itself is designed to detect and handle failures at the application layer, so delivering a highly-available service on top of a cluster of computers, each of which may be prone to failures.

The project includes these modules:
  • Hadoop Common: The common utilities that support the other Hadoop modules.
  • Hadoop Distributed File System (HDFS™): A distributed file system that provides high-throughput access to application data.
  • Hadoop YARN: A framework for job scheduling and cluster resource management.
  • Hadoop MapReduce: A YARN-based system for parallel processing of large data sets.

Apache Hadoop2.6 Installation

Configuring Secure Shell (SSH)   

Communication between master and slave nodes uses SSH, to ensure we have SSH server installed
and running SSH deamon.

Installed server with provided command:

 ~$ sudo apt-get install openssh-server  

You can check status of server use this command

 ~$ /etc/init.d/ssh status  

To start ssh server use:

 ~$ /etc/init.d/ssh start  

Now ssh server is running, we need to set local ssh connection with password. To enable passphraseless ssh use

 ~$ ssh-keygen -t dsa -P '' -f ~/.ssh/id_dsa
 ~$ cat ~/.ssh/id_dsa.pub >> ~/.ssh/authorized_keys
 OR
 ~$ ssh-keygen -t rsa -P '' -f ~/.ssh/id_rsa
 ~$ cat ~/.ssh/id_rsa.pub >> ~/.ssh/authorized_keys

to check ssh

 ~$ ssh localhost  
 ~$ exit  

Disabling IPv6

We need to make sure IPv6 is disabled, it is best to disable IPv6 as all Hadoop communication between nodes is IPv4-based.

For this, first access the file /etc/sysctl.conf


 ~$ sudo nano /etc/sysctl.conf  

add following lines to end

 net.ipv6.conf.all.disable_ipv6 = 1  
 net.ipv6.conf.default.disable_ipv6 = 1  
 net.ipv6.conf.lo.disable_ipv6 = 1  
Save and exit


Reload sysctl for changes to take effect

 ~$ sudo sysctl -p /etc/sysctl.conf  

If the following command returns 1 (after reboot), it means IPv6 is disabled.

 ~$ cat /proc/sys/net/ipv6/conf/all/disable_ipv6  

Install Hadoop

Download Version 2.6.0 (Stable Version)

 ~$ su -  
 ~$ cd /usr/local  
 ~$ wget https://archive.apache.org/dist/hadoop/core/hadoop-2.6.0/hadoop-2.6.0.tar.gz  
 ~$ tar xzf hadoop-2.6.0.tar.gz  
 ~$   
 ~$ mkdir hadoop  
 ~$ mv hadoop-2.6.0/* hadoop/  
 ~$   
 ~$ exit  

Update .bashrc with Hadoop-related environment variables

 ~$ sudo nano ~/.bashrc  

Add following lines at the end:

export HADOOP_HOME=/usr/local/hadoop  
export HADOOP_MAPRED_HOME=$HADOOP_HOME  
export HADOOP_COMMON_HOME=$HADOOP_HOME  
export HADOOP_HDFS_HOME=$HADOOP_HOME  
export YARN_HOME=$HADOOP_HOME  
export HADOOP_COMMON_LIB_NATIVE_DIR=$HADOOP_HOME/lib/native  
export JAVA_HOME=/usr/  
export PATH=$PATH:$HADOOP_HOME/sbin:$HADOOP_HOME/bin:$JAVA_PATH/bin  

Save & Exit

Reload bashrc

 ~$ source ~/.bashrc

Update JAVA_HOME in hadoop-env.sh

 ~$ sudo nano /usr/local/hadoop/etc/hadoop/hadoop-env.sh  

Add following line at the end:
 export JAVA_HOME=/usr/  

or if Java is Installed Manually:: double check your installed version of java and update path accordingly, I have assumed 1.7.0_51

 export JAVA_HOME=/usr/local/java/jdk1.7.0_51  

Save and exit

Hadoop Configurations

Now we are moving to update configuration files for Hadoop installation

 ~$ cd /usr/local/hadoop/etc/hadoop  

Modify core-site.xml – Core Configuration

The core-site.xml file contains information such as the port number used for Hadoop instance, memory allocated for the file system, memory limit for storing the data, and the size of Read/Write buffers.
Open the core-site.xml and add the following properties in between the <configuration> and </configuration> tags.

 ~$ sudo nano core-site.xml  

Add the following lines between configuration tags

   <property>   
    <name>fs.default.name</name>   
    <value>hdfs://localhost:9000</value>   
   </property>  
Your file will look like
 <configuration>  
   
   <property>   
    <name>fs.default.name</name>   
    <value>hdfs://localhost:9000</value>   
   </property>  
     
 </configuration>  

Modify mapred-site.xml – MapReduce configuration

This file is used to specify which MapReduce framework we are using. By default, Hadoop contains a template file, we are required to copy the file from mapred-site.xml.template to mapred-site.xml file.

 ~$ sudo cp mapred-site.xml.template mapred-site.xml  
 ~$ sudo nano mapred-site.xml  

Add the following lines between configuration tags.

   <property>   
    <name>mapreduce.framework.name</name>   
    <value>yarn</value>   
   </property>  
your file should look like:


 <configuration>  
   
   <property>   
    <name>mapreduce.framework.name</name>   
    <value>yarn</value>   
   </property>  
   
 </configuration>  

* Note you may have other configurations defined later, we are considering fresh install

Modify yarn-site.xml – YARN

This file is used to configure yarn into Hadoop.

 ~$ sudo nano yarn-site.xml  

Add following lines between configuration tags:


   <property>   
    <name>yarn.nodemanager.aux-services</name>   
    <value>mapreduce_shuffle</value>   
   </property>  
your file should look like:
 <configuration>  
   
   <property>   
    <name>yarn.nodemanager.aux-services</name>   
    <value>mapreduce_shuffle</value>   
   </property>  
     
 </configuration>  

 Modify hdfs-site.xml – File Replication

This file contains information like replication factor for application we have used 1, name-node path, data-node path to your local file system. this will be the location to store Hadoop information.

 ~$ sudo nano hdfs-site.xml  

Add following lines between configuration tags and check file path:


   <property>   
    <name>dfs.replication</name>   
    <value>1</value>   
   </property>   
   <property>   
    <name>dfs.name.dir</name>   
    <value>file:///home/hadoop/hadoopinfra/hdfs/namenode </value>   
   </property>   
   <property>   
    <name>dfs.data.dir</name>  
    <value>file:///home/hadoop/hadoopinfra/hdfs/datanode </value >   
   </property>  
your file should look like:
 <configuration>  
   
   <property>   
    <name>dfs.replication</name>   
    <value>1</value>   
   </property>   
   <property>   
    <name>dfs.name.dir</name>   
    <value>file:///home/hadoop/hadoopinfra/hdfs/namenode </value>   
   </property>   
   <property>   
    <name>dfs.data.dir</name>  
    <value>file:///home/hadoop/hadoopinfra/hdfs/datanode </value >   
   </property>  
     
 </configuration>  

Initializing the Single-Node Cluster

Formatting the Name Node:

While setting up the cluster for the first time, we need to initially format the Name Node in HDFS.

 ~$ cd ~  
 ~$ hdfs namenode -format  

Starting Hadoop dfs daemons:

 ~$ start-dfs.sh  

Starting Yarn daemons:

 ~$ start-yarn.sh  

Check all daemon processes:

 ~$ jps  

 6069 NodeManager  
 5644 DataNode  
 5827 SecondaryNameNode  
 4692 ResourceManager  
 6165 Jps  
 5491 NameNode  

* Process id will be changed for each execution, main idea is to check if certain processes are running fine.

You should now be able to browse the name-node in your browser (after a short delay for start-up) by browsing to the following URLs:

name-node: http://localhost:50070/

Stopping all daemons:

 ~$ stop-dfs.sh  
 ~$ stop-yarn.sh  
   

Now run examples.  looking for examples to run without changing your style of code, am going run Python MapReduce on New Version of Hadoop wait for post.

Wednesday, 7 May 2014

Installing Hadoop Single Node - 2.2

Get Started

Now we will check how to install stable version of Apache Hadoop on a Laptop running Linux Mint 15 but will work on all Debian based systems including Ubuntu. To start we need to acquire hadoop package and get java installed, to install java, if not already installed follow my install java post. to check which versions of java are supported with hadoop check Hadoop Java Versions. Next step is to acquire hadoop which could be downloaded @ hadoop webpage. we opted for hadoop-2.2.0 in our blog.

Apache Hadoop NextGen MapReduce (YARN)

MapReduce has undergone a complete overhaul in hadoop-0.23 and we now have, what we call, MapReduce 2.0 (MRv2) or YARN.
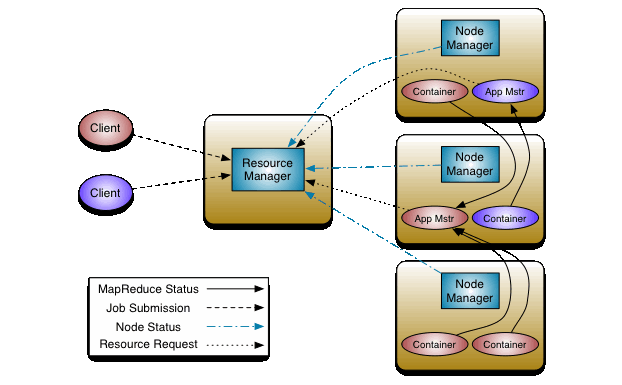
The fundamental idea of MRv2 is to split up the two major functionalities of the JobTracker, resource management and job scheduling/monitoring, into separate daemons. The idea is to have a global ResourceManager (RM) and per-application ApplicationMaster (AM). An application is either a single job in the classical sense of Map-Reduce jobs or a DAG of jobs.
The ResourceManager and per-node slave, the NodeManager (NM), form the data-computation framework. The ResourceManager is the ultimate authority that arbitrates resources among all the applications in the system.
The per-application ApplicationMaster is, in effect, a framework specific library and is tasked with negotiating resources from the ResourceManager and working with the NodeManager(s) to execute and monitor the tasks.


The ResourceManager has two main components: Scheduler and ApplicationsManager.
The Scheduler is responsible for allocating resources to the various running applications subject to familiar constraints of capacities, queues etc. The Scheduler is pure scheduler in the sense that it performs no monitoring or tracking of status for the application. Also, it offers no guarantees about restarting failed tasks either due to application failure or hardware failures. The Scheduler performs its scheduling function based the resource requirements of the applications; it does so based on the abstract notion of a resource Container which incorporates elements such as memory, cpu, disk, network etc. In the first version, only memory is supported.
The Scheduler has a pluggable policy plug-in, which is responsible for partitioning the cluster resources among the various queues, applications etc. The current Map-Reduce schedulers such as the CapacityScheduler and the FairScheduler would be some examples of the plug-in.
The CapacityScheduler supports hierarchical queues to allow for more predictable sharing of cluster resources
The ApplicationsManager is responsible for accepting job-submissions, negotiating the first container for executing the application specific ApplicationMaster and provides the service for restarting the ApplicationMaster container on failure.
The NodeManager is the per-machine framework agent who is responsible for containers, monitoring their resource usage (cpu, memory, disk, network) and reporting the same to the ResourceManager/Scheduler.
The per-application ApplicationMaster has the responsibility of negotiating appropriate resource containers from the Scheduler, tracking their status and monitoring for progress.

Apache Hadoop2.0 Installation

Create Dedicated Hadoop User

$ sudo addgroup hadoop
$ sudo adduser --ingroup hadoop hdpuser

Give user sudo rights

$ sudo nano /etc/sudoers
add this to end of file
hdpuser ALL=(ALL:ALL) ALL

Configuring Secure Shell (SSH)   

Communication between master and slave nodes uses SSH, to ensure we have SSH server installed
and running SSH deamon.

Installed server with provided command:

$ sudo apt-get install openssh-server

You can check status of server use this command

$ /etc/init.d/ssh status

To start ssh server use:

$ /etc/init.d/ssh start

Now ssh server is running, we need to set local ssh connection with password. To enable passphraseless ssh use

$ ssh-keygen -t dsa -P '' -f ~/.ssh/id_dsa
$ cat ~/.ssh/id_dsa.pub >> ~/.ssh/authorized_keys

to check ssh

$ ssh localhost
$ exit

Disabling IPv6

We need to make sure IPv6 is disabled, it is best to disable IPv6 as all Hadoop communication between nodes is IPv4-based.

For this, first access the file /etc/sysctl.conf

$ sudo nano /etc/sysctl.conf
add following lines to end
net.ipv6.conf.all.disable_ipv6 = 1
net.ipv6.conf.default.disable_ipv6 = 1
net.ipv6.conf.lo.disable_ipv6 = 1
Save and exit

Reload sysctl for changes to take effect

$ sudo sysctl -p /etc/sysctl.conf

If the following command returns 1 (after reboot), it means IPv6 is disabled.

$ cat /proc/sys/net/ipv6/conf/all/disable_ipv6

Install Hadoop

Download Version 2.2.0 (Stable Version)

Make Hadoop installation directory

$ sudo mkdir -p /usr/hadoop

Copy Hadoop installer to installation directory

$ sudo cp -r ~/Downloads/hadoop-2.2.0.tar.gz /usr/hadoop

Extract Hadoop installer

$ cd /usr/hadoop
$ sudo tar xvzf hadoop-2.2.0.tar.gz

Rename it to hadoop

$ sudo mv hadoop-2.2.0 hadoop

Change owner to hdpuser for this folder

$ sudo chown -R hdpuser:hadoop hadoop

Update .bashrc with Hadoop-related environment variables

$ sudo nano ~/.bashrc
Add following lines at the end:
# Set Hadoop-related environment variables
export HADOOP_HOME=/usr/hadoop/hadoop
export HADOOP_PREFIX=/usr/hadoop/hadoop
export HADOOP_MAPRED_HOME=${HADOOP_HOME}
export HADOOP_COMMON_HOME=${HADOOP_HOME}
export HADOOP_HDFS_HOME=${HADOOP_HOME}
export YARN_HOME=${HADOOP_HOME}
export HADOOP_CONF_DIR=${HADOOP_HOME}/etc/hadoop
# Native Path
export HADOOP_COMMON_LIB_NATIVE_DIR=${HADOOP_PREFIX}/lib/native
export HADOOP_OPTS="-Djava.library.path=$HADOOP_PREFIX/lib"
#Java path
# Import if you have installed java from apt-get
# use /usr/local/java/jdk1.7.0_51 (1.7.0_51 installed version) instead of /usr/
export JAVA_HOME='/usr/'
# Add Hadoop bin/ directory to PATH
export PATH=$PATH:$HADOOP_HOME/bin:$JAVA_PATH/bin:$HADOOP_HOME/sbin


Save & Exit

Reload bashrc

$ source ~/.bashrc


Update JAVA_HOME in hadoop-env.sh

$ cd /usr/hadoop/hadoop
$ sudo vi etc/hadoop/hadoop-env.sh

Add the line:
export JAVA_HOME=/usr/

or if Java is Installed Manually
export JAVA_HOME=/usr/local/java/jdk1.7.0_51

Save and exit

Create a Directory to hold Hadoop’s Temporary Files:

$ sudo mkdir -p /usr/hadoop/tmp

Provide hdpuser the rights to this directory

$ sudo chown hdpuser:hadoop /usr/hadoop/tmp


Hadoop Configurations

Modify core-site.xml – Core Configuration

$ sudo nano etc/hadoop/core-site.xml

Add the following lines between configuration tags
<property>
   <name>hadoop.tmp.dir</name>
   <value>/usr/hadoop/tmp</value>
   <description>Hadoop's temporary directory</description>
</property>
<property>
    <name>fs.default.name</name>
    <value>hdfs://localhost:54310</value>
</property>

Modify mapred-site.xml – MapReduce configuration

$ sudo cp etc/hadoop/mapred-site.xml.template etc/hadoop/mapred-site.xml
$ sudo nano etc/hadoop/mapred-site.xml

Add the following lines between configuration tags
<property>
   <name>mapred.job.tracker</name>
   <value>localhost:54311</value>
   <description>The URI is used to monitor the status of MapReduce tasks</description>
</property>
<property>
    <name>mapreduce.framework.name</name>
    <value>yarn</value>
</property>

Modify yarn-site.xml – YARN

$ sudo nano etc/hadoop/yarn-site.xml

Add following lines between configuration tags:
<property>
    <name>yarn.nodemanager.aux-services</name>
    <value>mapreduce_shuffle</value>
</property>
<property>
    <name>yarn.nodemanager.aux-services.mapreduce.shuffle.class</name>
    <value>org.apache.hadoop.mapred.ShuffleHandler</value>
</property>

 Modify hdfs-site.xml – File Replication

$ sudo nano etc/hadoop/hdfs-site.xml

Add following lines between configuration tags and check file path:
<property>
    <name>dfs.replication</name>
    <value>1</value>
</property>
<property>
    <name>dfs.namenode.name.dir</name>
    <value>file:/usr/hadoop/hadoop/yarn_data/hdfs/namenode</value>
</property>
<property>
    <name>dfs.datanode.data.dir</name>
    <value>file:/usr/hadoop/hadoop/yarn_data/hdfs/datanode</value>
</property>

Initializing the Single-Node Cluster


Formatting the Name Node:

While setting up the cluster for the first time, we need to initially format the Name Node in HDFS.
$ bin/hadoop namenode -format

Starting all daemons:

$ sbin/hadoop-daemon.sh start namenode
$ sbin/hadoop-daemon.sh start datanode
$ sbin/yarn-daemon.sh start resourcemanager
$ sbin/yarn-daemon.sh start nodemanager
$ sbin/mr-jobhistory-daemon.sh start historyserver

Check all daemon processes:

$ jps
4829 ResourceManager
4643 NameNode
4983 NodeManager
5224 JobHistoryServer
4730 DataNode
7918 Jps

You should now be able to browse the nameNode in your browser (after a short delay for startup) by browsing to the following URLs:

nameNode: http://localhost:50070/

Stoping all daemons:

$ sbin/hadoop-daemon.sh stop namenode
$ sbin/hadoop-daemon.sh stop datanode
$ sbin/yarn-daemon.sh stop resourcemanager
$ sbin/yarn-daemon.sh stop nodemanager
$ sbin/mr-jobhistory-daemon.sh stop historyserver

Now run examples.  looking for examples to run without changing your style of code, am going run Python MapReduce on New Version of Hadoop wait for post.

Monday, 3 March 2014

Running your First Example On hadoop using python


Overview

Even though the Hadoop framework is written in Java, but we can use other languages like python and C++, to write MapReduce for Hadoop. However, Hadoop’s documentation suggest that your must translate your code to java jar file using jython. which is not very convenient and can even be problematic if you depend on Python features not provided by Jython.

Example

We will write simple WordCount MapReduce program using pure python. input is text files and output is file with words and thier count. you can use other languages like perl.

Prerequisites

You should have hadoop cluster running if still not have cluster ready Try this to start with single node cluster.

MapReduce

Idea behind python code is that we will use hadoop streaming API to transfer data/Result between our Map and Reduce code using STDIN(sys.stdin)/ STDOUT(sys.stdout). We will use STDIN to read data
from input and print output to STDOUT.

mapper.py


import sys
for line in sys.stdin:
    line = line.strip()
    words = line.split()
    for word in words:
        print '%s\t%s' % (word, 1)


reducer.py

from operator import itemgetter

import sys


current_word = None

current_count = 0

word = None


for line in sys.stdin:

    line = line.strip()

    word, count = line.split('\t', 1)

    try:

        count = int(count)

    except ValueError:

        continue

    if current_word == word:

        current_count += count

    else:

        if current_word:

            print '%s\t%s' % (current_word, current_count)

        current_count = count

        current_word = word

if current_word == word:

    print '%s\t%s' % (current_word, current_count)


Running Hadoop's Job

Download Example Data to home directory like /home/elite/Downloads/examples/
Book1
Book2
Book3


Start Cluster

$ bin/start-all.sh

Copy Data from Local to dfs File System
$ bin/hadoop dfs -mkdir /wordscount
$ bin/hadoop dfs -copyFromLocal /home/elite/Downloads/examples/ /home/hdpuser/wordscount/

Here we have created directory in hadoop file system named wordcount and moved our local directory containing our test data to hadoop hdfs. We can check if files have been copied properly to hadoop directory by listing its content as presented below.

Check files on dfs
$ bin/hadoop dfs -ls /home/hdpuser/wordscount

Run MapReduce Job

I have both mapper.py and reducer.py and /home/hdpuser/ here is command to run job.
$ bin/hadoop jar contrib/streaming/hadoop-streaming-1.2.1.jar \
-file /home/hduser/mapper.py -mapper /home/hduser/mapper.py \
-file /home/hduser/reducer.py -reducer /home/hduser/reducer.py \
-input /home/hdpuser/wordscount/* -output /home/hdpuser/wordscount.out

You Can check status from terminal or web page http://localhost:50030/ configured in your cluster setup. after job is complete we can get results back by coping output file from hadoop file system to local

$ bin/hadoop dfs -copyToLocal /home/hdpuser/wordscount.out /home/hdpuser/

Check Result

$ vi /home/hdpuser/wordscount.out/part-00000

Stop running cluster

$ bin/stop-all.sh

Sunday, 2 March 2014

Installing Hadoop Single Node - 1.2.1

Get Started

Now we will check how to install stable version of Apache Hadoop on a Laptop running Linux Mint 15 but will work on all Debian based systems including Ubuntu. To start we need to acquire hadoop package and get java installed, to install java, if not already installed follow my install java post. to check which versions of java are supported with hadoop check Hadoop Java Versions. Next step is to acquire hadoop which could be downloaded @ hadoop webpage. we opted for hadoop-1.2.1 in our blog.

Create Dedicated Hadoop User

$ sudo addgroup hadoop
$ sudo adduser --ingroup hadoop hdpuser

Give user sudo rights

$ sudo nano /etc/sudoers
add this to end of file
hdpuser ALL=(ALL:ALL) ALL

Configuring Secure Shell (SSH)   

Communication between master and slave nodes uses SSH, to ensure we have SSH server installed
and running SSH deamon.

Installed server with provided command:

$ sudo apt-get install openssh-server

You can check status of server use this command

$ /etc/init.d/ssh status

To start ssh server use:

$ /etc/init.d/ssh start

Now ssh server is running, we need to set local ssh connection with password. To enable passphraseless ssh use

$ ssh-keygen -t dsa -P '' -f ~/.ssh/id_dsa
$ cat ~/.ssh/id_dsa.pub >> ~/.ssh/authorized_keys

to check ssh

$ ssh localhost
$ exit

Disabling IPv6

We need to make sure IPv6 is disabled, it is best to disable IPv6 as all Hadoop communication between nodes is IPv4-based.

For this, first access the file /etc/sysctl.conf

$ sudo nano /etc/sysctl.conf
add following lines to end
net.ipv6.conf.all.disable_ipv6 = 1
net.ipv6.conf.default.disable_ipv6 = 1
net.ipv6.conf.lo.disable_ipv6 = 1
Save and exit

Reload sysctl for changes to take effect

$ sudo sysctl -p /etc/sysctl.conf

If the following command returns 1 (after reboot), it means IPv6 is disabled.

$ cat /proc/sys/net/ipv6/conf/all/disable_ipv6

Install Hadoop

Download Version 1.2.1 (Stable Version)

Make Hadoop installation directory

$ sudo mkdir -p /usr/hadoop

Copy Hadoop installer to installation directory

$ sudo cp -r ~/Downloads/hadoop-1.2.1.tar.gz /usr/hadoop

Extract Hadoop installer

$ cd /usr/hadoop
$ sudo tar xvzf hadoop-1.2.1.tar.gz

Rename it to hadoop

$ sudo mv hadoop-1.2.1 hadoop

Change owner to hdpuser for this folder

$ sudo chown -R hdpuser:hadoop hadoop

Update .bashrc with Hadoop-related environment variables

$ sudo nano ~/.bashrc
Add following lines at the end:
# Set HADOOP_HOME
export HADOOP_HOME=/usr/hadoop/hadoop
# Set JAVA_HOME
# Import if you have installed java from apt-get
# use /usr instead of /usr/local/java/jdk1.7.0_51
export JAVA_HOME=/usr/local/java/jdk1.7.0_51
# Add Hadoop bin directory to PATH
export PATH=$PATH:$HADOOP_HOME/bin

Save & Exit

Reload bashrc

$ source ~/.bashrc


Update JAVA_HOME in hadoop-env.sh

$ cd /usr/hadoop/hadoop
$ sudo nano conf/hadoop-env.sh

Add the line:
export JAVA_HOME=/usr/local/java/jdk1.7.0_51

Save and exit

Create a Directory to hold Hadoop’s Temporary Files:

$ sudo mkdir -p /usr/hadoop/tmp

Provide hdpuser the rights to this directory

$ sudo chown hdpuser:hadoop /usr/hadoop/tmp


Hadoop Configurations

Modify conf/core-site.xml – Core Configuration

$ sudo nano conf/core-site.xml

Add the following lines between configuration tags
<property>
   <name>hadoop.tmp.dir</name>
   <value>/usr/hadoop/tmp</value>
   <description>Hadoop's temporary directory</description>
</property>
<property>
   <name>fs.default.name</name>
   <value>hdfs://localhost:54310</value>
   <description>Specifying HDFS as the default file system.</description>
</property>

Modify conf/mapred-site.xml – MapReduce configuration

$ sudo nano conf/mapred-site.xml

Add the following lines between configuration tags
<property>
   <name>mapred.job.tracker</name>
   <value>localhost:54311</value>
   <description>The URI is used to monitor the status of MapReduce tasks</description>
</property>

Modify conf/hdfs-site.xml – File Replication

$ sudo nano conf/hdfs-site.xml

Add following lines between configuration tags:
<property>
   <name>dfs.replication</name>
   <value>1</value>
   <description>Default block replication.</description>
</property>

Initializing the Single-Node Cluster


Formatting the Name Node:

While setting up the cluster for the first time, we need to initially format the Name Node in HDFS.
$ bin/hadoop namenode -format

Starting all daemons:

$ bin/start-all.sh

You should now be able to browse the nameNode and JobTracker in your browser (after a short delay for startup) by browsing to the following URLs:

nameNode: http://localhost:50070/
JobTracker: http://localhost:50030/

Stoping all daemons:

$ bin/stop-all.sh

your can seperatly start stop as

hdfs:

$ bin/start-dfs.sh
$ bin/stop-dfs.sh

mappered:

$ bin/start-mapred.sh
$ bin/stop-mapred.sh


Now run examples Java Word Count Example.  looking for examples to run without changing your style of code, am going run python map-reduce wait for post.

Saturday, 1 March 2014

Big Data and Analytics - Hadoop

What is Big Data?

Big data is buzzword to describe massive volume of structured or unstructured data. Data is too large and complex and impractical to manage with traditional software tools. Now enterprises have data that is too large, move too fast to exceed current data processing capacities. example could be petabytes or exabytes. billions to trillions of records. Big data is not only about too large data as described,

"Big Data Refer to technologies and initiatives that involve data that is too diverse, fast-changing or massive for conventional technologies, skills and infra-structure to address efficiently. Said differently, the volume, velocity or variety of data is too great." - Mongodb

Today's technologies have made it possible to evaluate Big data and realize value from it. retailers can track user web clicks to identify behavioral trends to improve campaigns. Big Data relates to data creation, storage, retrieval and analysis that is remarkable in terms of volume, velocity, and variety:

Volume: normal computers have storage from 250 gigabytes to 1 terabytes of storage. Today Facebook ingests 500 terabytes of new data every day.
Velocity: to capture ad impressions or user web clicks require millions of events per second.

Variety: Big Data is not only about numbers, dates, strings but is also geospatial data, 3D data, audio and video etc.

Big Data Analytic?

As described refer to process of collecting, organizing and analyzing large sets of data to discover patterns and other useful information. Not only it helps to understand information within data, but will help to identify data that is most important to the business and future business decisions. Big Data analysts basically want the knowledge that comes from analyzing the data.

Hadoop?

Hadoop is a software technology designed to store and process large volumes of data using a cluster of commodity servers and storage. it's an open-source Apache project originated in 2005 by Yahoo. It consists of a distributed file system, called HDFS, and a data processing and execution model called MapReduce. wait and visit next post to install & configure it, then practice MApReduce?